
I’m sure you’ve gone into your app drawer at least once, and you have seen the compass app. You’ve probably even tried it, played with it a little, and that’s it. You think of it just as a fun gimmick that you won’t ever need in your life – but I’m going to change your mind really quickly. Even if you aren’t the type who often goes out in the wild camping or just taking a hike, a compass can come in handy in many other situations.
Let’s say, for example, there has been a flood, and you need to leave town. You are in the woods with your family, lost without any way of orientation, trying to get back to safety. Your phone is out of juice, and a compass doesn’t seem like too bad of an idea now.
So down below, I’m going to show you the essential features of a compass, how to recognize the best from the worst, and how to make proper use of it.
1. Eyeskey Military
The Eyeskey Multifunctional Military Lensatic Tactical Compass is one of the best on the market right now. It has a fluorescent dial, which means it absorbs light during the day, thus allowing it to glow in the dark and never leave you lost, even at night. There is a screw hole at the bottom, and you can mount it to a tripod for even more accurate calculations. The jewel bearing in the compass allows the needle to move quickly and as smoothly as butter, with an amazing level of accuracy.
Its lightweight aluminum body is not only waterproof but also durable enough to get it and forget it. If you’re looking for a durable, waterproof navigation compass, you can’t go wrong with the Eyesky Multifunction Military Sighting Compass. From the bubble level to the conversion charts and florescent capabilities, everything is specifically designed to help you make quick and accurate bearings.
In my honest opinion, this here maybe, if not the best, is one of the best compasses, buy it now, and you won’t regret it.
Pros
- The compass uses a bright fluorescent dial, so even if it’s dark outside, you will be able to see it without any pesky batteries, perfectly
- At the bottom of the compass, there is a screw hole, so even if you need more stability, you can easily mount it to a tripod
- The jewel bearing in the compass allows the needle to move quickly and as smooth as butter, giving you even more accuracy
Cons
- It cannot measure degrees of inclination to a distant object, so when it comes to orientation, you are at a huge loss
- It does not open all the way flat to lay on the map, so orientation this way is also severely limited
2. CMMG Official

If you need a military-grade, sturdy, and durable compass, the Cammenga CMMG Official U.S. Military Tritium Lensatic Compass is your best option.
When it comes to hiking and camping, you can’t go wrong with something manufactured right here in the U.S. without the fat price tag that often accompanies name-brand professional-grade equipment. Because while it may not be the high-tech digital masterpiece that some off-shore brands offer, its toughness makes up for it.
While most compasses have a liquid-filled needle chamber, this one is different. Instead of the needle being suspended in a fluid, the Cammenga Lensatic uses copper induction over a flat dial tone to keep the needle stable. So even if you damage your compass badly, it’s almost certain it will still work. On the other hand, if you damage the needle chamber of the liquid-filled compass, the liquid is going to pour out, and the whole device will probably stop working.
Another place where the Lensatic compass shines is the temperature fluctuation resistance. Whereas a liquid-filled compass will be Lee’s accurate in cold or got areas because of the change of the liquid’s density, the Lensatic one is unaffected.
One huge disadvantage of this model is that it lacks a declination adjustment, so you’ll have to adjust it manually when you are going to travel a lot.
It’s bright tritium self-illumination that never needs to be charged, combined with the fact that it’s built to be almost indestructible. It is made in the U.S. to demanding military specifications, and its Lensatic design makes it a perfect choice at an affordable price what it offers.
Pros
- This compass is made only by strict military standards, so anything you throw at it won’t be a problem for its rugged exterior
- Because it is made right here in the USA, it manages to keep a very low price while still coming from a reliable source
- It utilizes a temperature fluctuation resistance, so no matter how hot or cold it is outside, you will get accurate readings all the time
Cons
- There are no magnetic declination adjustments and combined with 5-degree increments, you won’t be able to get much accuracy in your readings
- There are also no global needles, and if you’re going to use a map, forget about it because there is also a lack of a protractor base
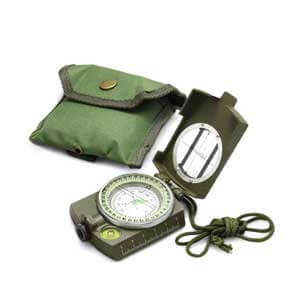
3. Cammenga Miltary

This is as simple as compasses get. It is an aluminum frame, with a glow in dark easy to see dial, and a nice green color to represent its military origins. And while yes, the compass has nothing special going on for it, the fact that it does its job flawlessly, at a price no other company can give you, makes this compass the ultimate budget choice for anyone that wants to stay orientated without forking out a lot of money.
As with all Cammenga products, this compass manages to tick off all of the necessary features and qualities to be not only a good everyday-use compass but also a military standard one. And you know that when something is used by the military, it is sure to be of the highest quality.
The compass is also waterproof; thus, you can use it even under the harshest conditions. It is even made by a famous brand, so that is a nice bonus, too.
Pros
- The compass is as simple as possible, allowing almost anyone to use it easily, no matter how bad the situation is, there are no clunky features
- It has a very sturdy aluminum frame that protects it even from harsh impacts while still keeping its weight to a minimum
- For someone who is a budget, this is the perfect choice as no other analog model gives you this much accuracy for such a low price
Cons
- The compass lacks any sort of water of splash proofing, so even if a bit of moisture gets in, you won’t be able to read it
- The company has a great reputation, but even so, the customer support that they offer is horrendous, so even if something goes wrong, don’t expect proper treatment
4. Garmin 64s
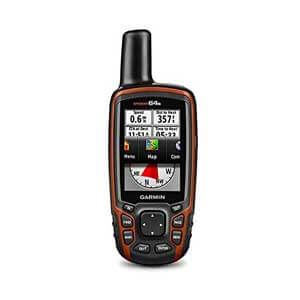
You’ve probably heard of Garmin, maybe you even have one of their navigations in your car, and they are one of the best in the business.
It features a pretty large for a digital compass 2.6-inch display that is bright enough even to read in sunlight.
GPSMAP 64s also comes with a built-in worldwide base map with shaded relief plus a 1-year BirdsEye Satellite Imagery subscription and secure software for photo navigation, thus meaning you can download geotagged pictures from the Internet and navigate to them
The quad-helix antenna and high sensitivity allow you to connect in even dense and low areas like canyons or deep woods.
The source of its significant feature is also the root of its biggest problem – it’s digital, thus meaning that it’s the battery isn’t going to last forever. And 16 hours may seem like a lot, but if you are an inexperienced hiker, you will burn through them much quicker.
So to wrap things up – if you are going to go with digital, this is your choice.
Pros
- This is the best digital compass there is from the most profound brand you can find, offering you only high-end components and features
- It has a pretty big screen, 2.6 inches, which is bright and big enough to be read even in the harshest and most direct sunlight
- Its quad-helix antenna and high sensitivity give you a stable connection no matter where you are, even if it’s deep in the jungle or high atop a mountaintop
Cons
- Its battery is too short to be used by most inexperienced hikers, and combined with a complex interface, this is a model that should only be used by professionals.
- The base map is not as good as on some other compasses, and comparing it to previous models, it is inferior in some categories
5. Bad Elf 2200
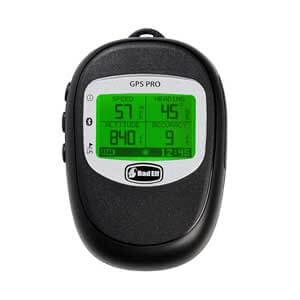
So, if you still want to go with the digital option and all its advanced features but don’t want to fork out a lot of money, this is the best budget alternative.
It has a great option to share your location right to your mobile, but it’s only limited to iOS. This model battery lasts as long as the Garmin, but without location sharing, it can last up to 35 hours.
Its LCD Backlit screen is good enough to be read at night, but it can give you some problems at noon and in harsh sunlight.
So overall, while it doesn’t have all the features out there for this price, the things it has going for it, combined with the pretty long battery life, make it an excellent choice for any hiking novice out there.
Suffice it to say, with an astonishing jewel bearing and а great amount of advanced features, this may be one of the most accurate compasses to buy right now.
Pros
- This compass has all the features you may want while still keeping its price significantly lower than that of its competitor from Garmin
- If you are hiking in a group and you or someone else gets lost, there is a great feature that can share your direct location with a press of a button on a phone
- Its battery with all the features turned on is as good as the one on the Garmin, and with location share off, it can last more than double the time
Cons
- The LCD screen is good enough for nighttime use, but during the day, the harsh sunlight or the setting sun may give you a problem
- The reception of the device isn’t as good as it can be, and sometimes when there is bad weather, or you are deep in the woods, you can lose the connection
How to Choose The Best Compass for Hiking?
After you’ve learned to use a compass properly, you know that it’s not just merely an arrow that shows north but also a multifunctional navigation tool that encompasses many different features. There is a couple of must-have features, which I’m going to list to you, but there are even more additional ones that can seem arbitrary, but sometimes you may never know when you’ll need a signal mirror.
Must-have Features
The essential things you want from a compass aren’t much – just four.
- Declination correction: if you are planning to use your compass for serious orientating, you should adjust your location’s declination coefficient. Fixed declination isn’t a great thing, so avoid it.
- Sighting hole and mirror: if you are planning to go off the beaten path, you should upgrade to a higher-grade model with a sighting mirror for the best accuracy.
- Global needle: If you’re going to travel around the world, or just south of the northern hemisphere, a compass that incorporates a universal needle for the different.
- Clinometer: For mountaineering and backcountry skiing, a compass with a clinometer can help you assess avalanche hazards. Field scientists and search-and-rescue professionals also like to have a clinometer.
There are also a couple of advanced features that can be present on your item, and they usually don’t improve your adventure experience that much, nor do they change the compass’s accuracy.
Decide On The Type Of Compass You Want
Analog vs. Digital
We live in a new digital age, where even the compasses get some additional bells and whistles. There are standards and compasses for hiking models, but they aren’t for everyone. Even though they are a little bit quicker with the advanced features that they have and, in some cases, even more accuracy, they won’t give you any true benefits to your adventure.
They are digital, so obviously, they are battery-powered. You need to be ready to change or charge the batteries at any time because you are dependent on them. And if you forget your spares or your portable charger, you can be left without a compass where you will need it the most. On the other hand, adjusting from the southern to the northern hemisphere and correcting the declamation is done very quickly and painlessly and sometimes even automatically, but that doesn’t make up for the lackluster reliability.
On the other hand, all-analog devices don’t require an additional power source, so you can store an analog compass for months or years, and it will still work, but it won’t have any extra features like a digital one. If you aren’t an experienced hiker, you should go for the safer option.
Simple Baseplate Compass
These compasses are as basic as it gets, with their philosophy being “the needle is all you need.” Without much model variety, there is almost always just a see – trough acrylic base plate, so you can see and read the map below and a compass, nothing more, nothing less.
These compasses are an excellent choice for inexperienced hikers and mountaineers.
Liquid Filled Compass
Liquid Filled Compass isn’t a single type of compass specifically, so to speak, and while many models incorporate this type of setup, it’s still considered a category of its own.
Adding fluid inside the needle chamber helps the compass absorb unwanted vibrations and movements. This in itself helps the needle keep its position steady, thus making it a significant feature for people who are going to do some serious orientating.
Orienteering Compass
These compasses are the creme de la creme of all compasses and are the most high-end and quality models out there. They also have transparent baseplates like the simplest compasses but also feature rulers, declination scales, and sighting mirrors.
These are full features compasses for mountaineers and hikers only.
How to Use a Compass and What are Its Parts?
Even if you buy the most expensive and high-tech compass money can buy, if you don’t know how to use it properly, or you don’t know the name of its parts, then even a survival guide can’t help you much.
So to educate you a little bit, here’s easy to read and remember a guide for adequately using a compass.
1. Get to Know the Parts of a Compass
Here I’m going to use only the compass’ essential features because most of them do have additional ones like signal mirrors or others, but the basic ones are the most important.
Baseplate
The base plate should always be evident, so you can overlay it over the map quickly, and rectangular with straight edges to take bearings and effortlessly transfer them on your map. A reinforced plastic polymer one or even a glass one, if you are sure you can handle it carefully, is a perfect choice.
Ruler
An engraved ruler is always better than a painted one because even if you have beatеn it badly, you will still be able to read it. It should preferably be with the measuring system you use in your country because, in an emergency, you can’t be bothered to solve math problems.
Direction-of-travel arrow
Direction-of-travel arrow is a significant part of the compass because while taking and following a bearing, it shows you what direction to point the compass, allowing you to overlay a path through the map.
Rotating bezel
This outer-most ring is also called an “azimuth ring,” which comes from Arabic and means directions. It rotates fully, allowing it to turn three hundred and sixty degrees, and is mainly used for taking a bearing.
Index line
The index line is an indication line located directly above the bezel and is also widely known as ‘read bearing here.’
Magnetic needle
The magnetic needle is maybe the most confusing and straightforward piece of the compass at the same time. For some people, it may be obvious how to use it, and that’s alright. The red of the right part of the needle is affected by the magnetic field and pole, so it always points true north, no matter where your compass is orientated.
Orienting arrow
Orienting arrow is a graphic that is shaped just like the magnetic arrow’s shaft, and it is used to orientate the bezel exactly to the bolt.
Orienting lines
These are two lines that are like the orienting arrow with the bezel. By orientating these two parallel lines with the north-south lines on your map, you will have aligned your orientating arrow also true north.
2. Adjust Declination

Orientating is a pretty straightforward process because the top of the map is pointing north, but that doesn’t mean that the true magnetic north is the same as that one on the map. That difference is more widely known as declination.
For example, in the eastern parts of the U.S., like Washington, there could be a 20-degree declination difference – the opposite of the west, like the main. And forty degrees may not seem like much, but a single degree of error can make an enormous impact on your planned path from 100 feet to over a mile. So, declamation should not be overlooked.
But before you go out and start solving complicated equations, you need to find your area’s declamation coefficient. Topographical maps list it, but because of the constant change of the earth’s magnetic field force, the factor also changes over time. So to make sure you are correct, check your map’s revision date or consult the NOAA magnetic declination database.
Declination adjustment is made differently by different brands, and depending on the model of the compass you have, there could be a small tool for the job, but there will always be instructions included. Once the declination of your compass is set, if you aren’t going to travel far away again, you won’t have to worry about it.
3. Orient Your Map

Reading a basic map is a skill you should have trained enough to be no brainier in any situation. It is essentially the skill to see the collaboration between what you see around you and what you see on the map. But to do that, you must have your map orientated correctly. Though to calm you down a little, the only hard part of the process is setting your declaration, which in itself isn’t that hard.
First, place the compass with the direction of the travel arrow pointing towards the north. Then rotate the bezel so north is lined up throughout the travel arrow. Then put the compass on the map and align one of the straight edges with one of the map, while still making sure that the arrow is pointing correctly. Finally, with both the map and compass set correctly, you can rotate the whole contraption until the magnetized needle matches up with the north on your map and the direction of the travel arrow.
So, you got your map correctly orientated now, and don’t worry if it was a little bit hard the first time, I took my sweet time too. But don’t go out head first in the wild with a lot of confidence, familiarize yourself with the surroundings first. And keep track of your map the whole way through, it’s better to know your location most of the time than find you’re lost when it’s too late.
4. Take a Bearing
A “bearing” is a more precise way of describing a specific direction. For example, when you choose your path, instead of heading southeast, you may say you are going 156 degrees. But do take note, bearings aren’t the same for two destinations. They are relative to your current location.
Taking a Bearing from a Map
If you know your exact map location, taking a correct bearing isn’t that difficult.
First, set your compass up on the map so that one of the straight sides makes a route from your current location to the destination, where you want to go, for example, a lodge. Make sure that the destiny of the travel arrow is pointing in the general direction of where you want to go, not in the opposite. Afterward, rotate the bezel so that the orientating lines line up with the map’s north-south grid lines. Then, make sure that the north marker on the bezel is pointing north on the map. Now your index line will indicate the bearing you took and will lead you in the right direction.
Now your compass is set right so you can follow your bearing with it. Hold the compass with the direction of the travel arrow pointing away from you. Rotate your body until the magnetized needle is inside the orienting arrow. The direction of the travel arrow is now facing the bearing you captured, and you can follow it to your destination.
Taking a Bearing in the Field
While you can take a bearing from your map to a specific destination, or you want to know where you are precisely positioned, you can take a bearing from your surroundings and make out where you are on the map.
First, find an object that you can identify around you and that is also visible on your map. Hold your compass flat with the direction of the travel arrow pointing opposite from you and directly at the object. Now rotate the bezel so the magnetized needle fits snugly into the path of the travel arrow. And like the last time, the index arrow will indicate the bearing you just took.
Now you can transfer that bearing to your map to find your location. Lay your compass on the map and aline one corner of the straight edge with the object. Make sure that the direction of the travel arrow remains pointed in its direction, and rotate the entire base plate until the orienting lines are running north/south and the north marker on the bezel is pointing north on the map. Now you can draw a line on the map along the straight edge of your compass. The point where that line from the landmark crosses your trail is your location.
You can also use multiple bearings to find where you are on a map. If you aren’t on a linear feature like a trail, you can still see where you are on a map by using triangulation, which you’ve probably learned at school.
Final Words
Whatever you may be doing in the wild outdoors, be it mountaineering or hiking, a compass is a total must-have. Digital or analog, you should buy one and put it in your bag because you never know when you will need it.
You should never cut corners when buying a compass because this will be one of the best companions on your adventure. But don’t go overboard, the only thing you really need is accuracy, anything more is just optional, but features like declination correction are very well wanted.